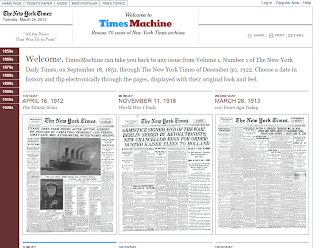
Times Machine—Bring Social Studies to Life!
 Instead of just reading about the sinking of the Titanic or the end of World War I in your Social Studies text book, send students out to explore what The New York Times was reporting about it. The Times Machine, part of The New York Times website is set up to allow you to easily travel back in time to September 8, 1851 (the date of the first edition) through 1922.
The main page of the site has direct links/snapshots of newspapers from some of the most important events covered during those years including the sinking of the Titanic, Lincoln’s assassination and the end of World War I, as well as a “100 years ago today” link. These pages and stories are available for the general population to peruse.
When you click on one of the newspapers, then hover over the story you want to look at, you can click on a link to a PDF of the actual story as it appeared in the paper.
The right side of the page has a list of years with a calendar function that allows you to click on specific dates. Unfortunately, full access is limited to those who have a subscription to the NY Times, or can be found in a ProQuest database.
Even though full access is limited, you might still find inspiration for a compare/contrast lesson on current events of today vs. 100 years ago or your students might find the contemporary viewpoints of Lincoln’s assassination interesting.
Need your students to get there quickly? Consider posting a QR code to the site in your classroom.
March Madness & Science
March is the time for Basketball, so check out this Muscle Motion video. It’s an illustrated guide that shows how a basketball player uses biceps and triceps to shoot a basket. It shows how skeletal muscles move in pairs to move the body.
The video is part of a Science Book website maintained by DK publishers.
They have more videos under Life, Earth & Physical Sciences that you may find useful.
Smart Notebook Tiles Activity Page
One of the pre-made activity pages in Smart Notebook you might find helpful for a lesson is the “Tiles” page. There are a few different styles of the activity and the pages act as a sort of card reveal activity.
You could use it to review states and capitals, famous people, important events, scientific terms, math facts, as a game, or as a way to introduce notes to students without introducing them all at once.
Be sure to check out the Example Tile activities under the Examples folder. To get to those examples—click on the Gallery icon and search for Tiles. Expand the area that says Notebook Files and Pages. Here you will see five different example activities: a states/capitals, picture reveals, music lesson, and a jeopardy style game.
The way it works:
Click on the Gallery Icon in Smart Notebook
Open the folder that says: Lesson Activity Toolkit 2.0
Scroll through the list until you see the folder for “Tiles” and open it
Click on the blue “Interactive Multimedia” bar to expand the list
Click and drag your selection into a blank Notebook page
Press the Edit button in the top right hand side of the screen
Change the number of tiles that will appear on the page by selecting from the drop down menu
 Click the Text tab at the top, check the box that says “Text”. This is where you customize what appears on the outside of the tile.
Then click in each box and type in what you want the first boxes to say—states, questions, the number of points they will earn for answering the question etc.
Click the Objects tab—This is where you customize the answer—here you can use pictures or words as the revealed answer/ question etc.
To insert text, click on the Text icon at the top of the screen, click in your box and begin typing. You will need to resize the text size to make it fit. Once you have your first text box set up correctly, to save time, copy and paste it into the other boxes, then type over the text as needed.
When you are satisfied with all of your text boxes, click on each box, click on the arrow, then choose Order and Send to Back.
I also suggest you choose Locking & Lock in Place to keep the boxes from moving.
When you are ready to use the activity, click OK and you can begin clicking on the tiles to reveal the information on the opposite side.
To create a picture reveal—I would suggest starting with one of the activities (Tiles 3 or Tiles 5) that are already created under Notebook Files and Pages. Click, Edit then the Objects Tab unlock the picture that is currently there by clicking on the picture, then click on the lock in the corner, choose Unlock, then cut. From this point you can search the Gallery for pictures to use or insert a picture from your own files.
The activity is a little tricky to get used to, but once you get the hang of the techniques you need to use to create an activity, you may find many options for the activity.


Comments
Post a Comment