These are a collection of the Smart Notebook tips I've sent out over the last few months.
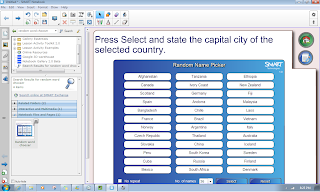
 To access the page, click on the picture frame icon in your Smart Notebook (pictured on the left). Then, on the search bar, type in “Random Word Chooser” and click Notebook Files and Pages under the results. You will see a thumbnail view of the page.
 2. Spotlight: When you use the magic pen to draw a circle or oval on the page, everything outside of the circle is blackout out so only what is inside can be seen.
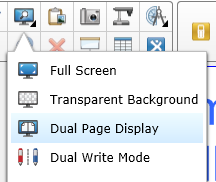
 Have you ever demonstrated how to do a task or given instructions on one Smart Notebook page only to discover you need to move on in the Notebook, but students still need to view your example or instructions. Use Dual Page View and the Pin It feature. To use Pin It, you will need to add it to your toolbar.
 From now on, when you want to Pin a page in place, then move forward through your Notebook file, you simply need to click on Dual Page View, then select the file you want to pin or keep in place and select the Pin It Icon. The page will stay put on the right side of the screen, and you can continue moving forward in your Notebook.

 Click on the writing and a box will appear around it. Click the drop down arrow that appears in the corner.


Random Word Chooser
The Gallery in Smart Notebook is filled with tons of pre-made pages that, when tailored to meet the goals of your lesson can be a real time saver.
Take for example The Random Word Chooser. You could use a modified page like this daily as a way to randomly call on students, or as a way to review key concepts from a unit. Because the page is pre-made, all you have to do is insert it into your file, then change the content that is currently on it.

Click on the thumbnail and drag it onto the Notebook page. Now you can edit the words in the list, change the number of spots available and choose the “No Repeat” option.
When you are ready to use the chooser in class, simply click the Select button and the chooser will highlight the selected item. Use the Reset button to start over.
The Magic Pen
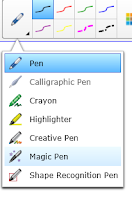
The magic pen is a fun tool to use and it has three functions.
1. Disappearing Ink: When you use it as a regular pen, the ink disappears, which could be helpful in getting the kids attention, or in annotating something you don’t want to stay on the page for long. You could also use it as a timer cue to help kids quiet down, get back to their seats etc. Simply write the numbers 1-10 on the board and tell them they have to be back to their seats or quiet by the time the ink disappears.
 2. Spotlight: When you use the magic pen to draw a circle or oval on the page, everything outside of the circle is blackout out so only what is inside can be seen.
3. Magnifier: If you draw a square or rectangle with the magic pen, the area becomes a magnifier.
The spotlight and magnifier can be resized and used to highlight specific areas on the Notebook page.
Pin It in Place!
 Have you ever demonstrated how to do a task or given instructions on one Smart Notebook page only to discover you need to move on in the Notebook, but students still need to view your example or instructions. Use Dual Page View and the Pin It feature. To use Pin It, you will need to add it to your toolbar.
Click on View then Customize Toolbar. The drag the Pin It icon to right below the Dual Page View icon.
 From now on, when you want to Pin a page in place, then move forward through your Notebook file, you simply need to click on Dual Page View, then select the file you want to pin or keep in place and select the Pin It Icon. The page will stay put on the right side of the screen, and you can continue moving forward in your Notebook.
Convert Your Handwriting to Text
My handwriting is terrible, so the SmartBoard feature I use the most is “Recognize Text”. This handy little tool will convert your sloppy penmanship into digital type text that all the kids can read!
To convert your handwriting on the Smartboard, go ahead and write away on your Smart Notebook page.

When you have finished, place the pen in the tray and select the arrow.
 Click on the writing and a box will appear around it. Click the drop down arrow that appears in the corner.
Choose recognize and the word(s) it should say and your text will appear.
If the text doesn’t show up correctly, you can always go ahead and choose recognize, then correct the spelling by clicking in the box.


Comments
Post a Comment