Post appeared also on FtEdTech
It's no real secret that I love Digital Interactive Notebooks. I create them every chance I get and encourage teachers to use them for everything from long term Project Based Learning (PBL) projects to weekly unit work with vocabulary.
The Interactive Notebook (INB) has long been a staple of the classroom to engage students more directly with their notes. The traditional interactive notebook often includes traditional student notes, questions, and interactives that students cut, fold, color and paste into their notebooks. You might find graphic organizers, pockets with measuring tools, data charts, and foldables that act as study aides. In the NSTA article "Science Interactive Notebooks in the Classroom" Jocelyn Young explains the benefits of INB when she shares that "By using notebooks, students model one of the most vital and enduring functions of scientists in all disciplines—recording information, figures, and data. A second reason for maintaining a science interactive notebook is that it provides a ready reference for each unit, as well as a resource to consult for review".
The downfall of these notebooks is the time that it often takes to cut out the interactives and of course all the glue: it doesn't take much spill over around a corner to permanently stick an important page to the one in front of it. This is where the Digital Interactive Notebook (DINB) comes into play. With a little creativity, you can still accomplish many of the same learning goals digitally.
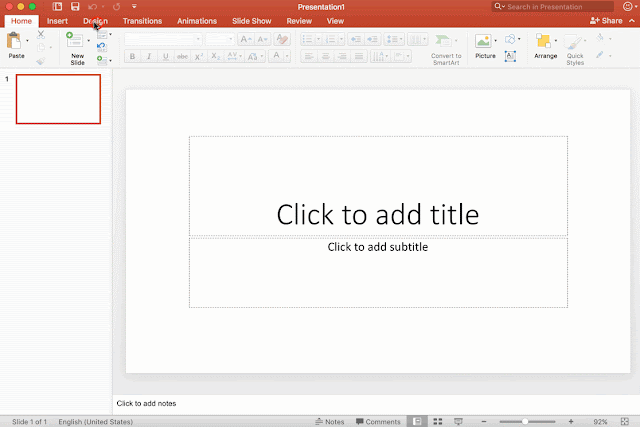
 DINB work best in either Google Slides or PowerPoint because students can use the slide sorter pane on the left to quickly maneuver through the notebook. The choice of Google Slides vs PowerPoint largely depends on the device. If using an iPad, the PowerPoint app proves to be a much more robust choice since students have the opportunity to use draw features and easily add images, video and add-ins that include quizzes. If using a computer, Slides is a more natural choice because the Explore feature opens up tools that allow for easier formatting, and you can insert photos directly from image searches and embed YouTube videos easily.
Google Slides
To customize the size in Slides go to:

PowerPoint
To set a custom size in PowerPoint go to:
 Once you have selected your application and size, you're ready to begin. You can make your notebook very simple and use text boxes, shapes, and design layouts to create graphic organizers, as well as space for notes and directions for adding things like drawings and collages.
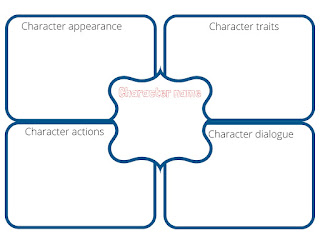
It helps to look through examples of notebooks to get some ideas for what you might create. Here are a few basic examples I have created. I have found that once I have the basic organizer created I can copy and paste that into many different notebooks.
The bonus of using images is that I can upload them to Google or use them in PowerPoint, they can also be distributed to students on their iPads for applications like Seesaw or Draw and Tell. Using an image as the background, also reduces the likelihood that a student will accidentally delete an element of page that they need.
When designing in Canva, I most often pick the Presentation 16:9 template. I find that it is a perfect fit in Slides or PowerPoint when I insert it as a background. If you're stuck for inspiration, check out the templates offered by Canva. I can almost always find something to inspire me and simplify my work there.
You can add over 30 slides to a Canva file by pressing the "Add a new page" button.

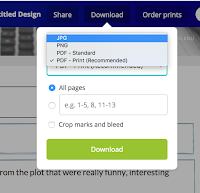
To download the file, choose JPEG or PNG. This will download your file to your computer as a zip file with all pages saved as an individual image.
You can then share these pages to your tool of choice: PowerPoint, Slides, Seesaw, Draw and Tell or even just as a print out if needed.

 Google Slides
From the menu bar choose:
It's no real secret that I love Digital Interactive Notebooks. I create them every chance I get and encourage teachers to use them for everything from long term Project Based Learning (PBL) projects to weekly unit work with vocabulary.
The Interactive Notebook (INB) has long been a staple of the classroom to engage students more directly with their notes. The traditional interactive notebook often includes traditional student notes, questions, and interactives that students cut, fold, color and paste into their notebooks. You might find graphic organizers, pockets with measuring tools, data charts, and foldables that act as study aides. In the NSTA article "Science Interactive Notebooks in the Classroom" Jocelyn Young explains the benefits of INB when she shares that "By using notebooks, students model one of the most vital and enduring functions of scientists in all disciplines—recording information, figures, and data. A second reason for maintaining a science interactive notebook is that it provides a ready reference for each unit, as well as a resource to consult for review".
The downfall of these notebooks is the time that it often takes to cut out the interactives and of course all the glue: it doesn't take much spill over around a corner to permanently stick an important page to the one in front of it. This is where the Digital Interactive Notebook (DINB) comes into play. With a little creativity, you can still accomplish many of the same learning goals digitally.
Getting Started: Slides vs PowerPoint

Getting Started: Slide Size
The next thing you'll want to consider is the layot of your notebook. Both Slides and PowerPoint obviously use a default horizontal layout, but you can customize that to mimic a more traditional notebook page if you choose. If working on an iPad, the horizontal view often feels more natural to work with, but it also depends on the content and the types of organizers or activities you want students to do.Google Slides
To customize the size in Slides go to:
- File
- Page Setup
- Custom
- Manually enter the size you would like

PowerPoint
To set a custom size in PowerPoint go to:
- Design Tab
- Slide Size
- Page Set Up
- Enter the desired size
- Press OK
- Choose Scale Up

Design Basics
 Once you have selected your application and size, you're ready to begin. You can make your notebook very simple and use text boxes, shapes, and design layouts to create graphic organizers, as well as space for notes and directions for adding things like drawings and collages.
 It helps to look through examples of notebooks to get some ideas for what you might create. Here are a few basic examples I have created. I have found that once I have the basic organizer created I can copy and paste that into many different notebooks.
Example Notebooks
Tips and Tricks
One thing that I prefer to do is to create graphic organizers and templates in Canva and use those images that I download as the background on my slides.The bonus of using images is that I can upload them to Google or use them in PowerPoint, they can also be distributed to students on their iPads for applications like Seesaw or Draw and Tell. Using an image as the background, also reduces the likelihood that a student will accidentally delete an element of page that they need.
When designing in Canva, I most often pick the Presentation 16:9 template. I find that it is a perfect fit in Slides or PowerPoint when I insert it as a background. If you're stuck for inspiration, check out the templates offered by Canva. I can almost always find something to inspire me and simplify my work there.
You can add over 30 slides to a Canva file by pressing the "Add a new page" button.


To download the file, choose JPEG or PNG. This will download your file to your computer as a zip file with all pages saved as an individual image.
You can then share these pages to your tool of choice: PowerPoint, Slides, Seesaw, Draw and Tell or even just as a print out if needed.
Adding Images to your Background
If using PowerPoint or Slides, you'll want to insert it as a background image. To do that in PowerPoint you:- Click on the Design Tab
- Format Background
- Picture or Texture
- File
- Navigate to your image
- Insert

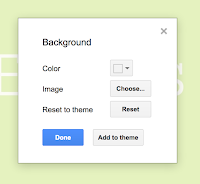
 Google Slides
From the menu bar choose:
- Background
- Image Choose..
- Locate the file - upload right there, or upload to your Drive ahead of time
Sharing Files to Students
Once you have your notebook files complete, you're ready to share. If sharing complete digital interactive notebooks, it would be best to use a tool like Schoology or Google Classroom. With Schoology's Google and Microsoft Assignments, you can share documents with students and maintain connection so that you can check in on their work. Check out how to do that here. For Google Classroom users, you would use your Google Drive - you can upload and convert a PowerPoint to Slides if you began your work there. You can also use tools like Seesaw to share page by page for editable lessons.Additional Tools to Help You Create and Get Inspired
Marzano Strategies - use some of these strategies to inspire activities and graphic organizers to use in your notebooks
- Visible Thinking Strategies - Project Zero from Harvard has a number of really good visible thinking strategies that could be used as inspiration for organizers and activities
- Canva Colors - if you need help considering a color scheme, this is a great tool that lets you plug in a color and browse for combinations
- The Noun Project - Find a ton of vector images to help with visual elements. An educator account is very reasonable, otherwise you can download black vector images with source information
- Brittanica Image Quest Use our district subscription to find safe to use image
How can I have students add a page at a time to their notebooks so I can grade them as they go? Ideally I would like to send them a page when ready, have them turn in and then add to their notebook.
ReplyDeleteThis is a good resource for using Google Pages, which does what you're asking. https://techycoach.com/2017/03/30/an-interactive-notebook-for-the-digital-classroom-2/
Deletemy question too!
ReplyDeleteThis is a good resource for using Google Pages, which does what you're asking. https://techycoach.com/2017/03/30/an-interactive-notebook-for-the-digital-classroom-2/
DeleteBuy Ambian Online Legally fast delivery.
ReplyDeleteBuy Ambien Online, Sleeping Disorders treatment.
Ambien USA Pharmacy at Your service! Buy Ambien online with US-US delivery and express delivery.
Zolpidem online available online available.
Ambien is a sleep aid that promotes sound sleep throughout the night.
if you want to buy ambian or know everything about ambian pills visit our blog page and
CALL ourexpert for more details +18056098797.
Thank you very much for providing important information. All your information is very valuable to me.
ReplyDeleteVillage Talkies a top-quality professional corporate video production company in Bangalore and also best explainer video company in Bangalore & animation video makers in Bangalore, Chennai, India & Maryland, Baltimore, USA provides Corporate & Brand films, Promotional, Marketing videos & Training videos, Product demo videos, Employee videos, Product video explainers, eLearning videos, 2d Animation, 3d Animation, Motion Graphics, Whiteboard Explainer videos Client Testimonial Videos, Video Presentation and more for all start-ups, industries, and corporate companies. From scripting to corporate video production services, explainer & 3d, 2d animation video production , our solutions are customized to your budget, timeline, and to meet the company goals and objectives. As a best video production company in Bangalore, we produce quality and creative videos to our clients.
I sincerely appreciate for your outstanding contribution in writing such an informative and engaging blog. Your dedication to delivering valuable content has not only enriched our platform but has also provided our readers with meaningful insights. Unlock academic success with BookMyEssay's Assignment Help Tutors! Our expert tutors provide personalized guidance, ensuring comprehensive understanding and excellence in your assignments. Elevate your grades with our dedicated support.
ReplyDeleteThis comment has been removed by the author.
ReplyDeleteThanks for sharing such wonderful stuff. Keep sharing and keep up the good work < a href = " https://nokshion.blogspot.com/" > Learning
ReplyDelete"I am so impressed by the quality of content here. It’s clear you put a lot of effort into making sure everything is top-notch!"
ReplyDeleteUrimax 0.4 mg
This comment has been removed by the author.
ReplyDeleteThis comment has been removed by the author.
ReplyDeleteThis comment has been removed by the author.
ReplyDeleteThis comment has been removed by the author.
ReplyDeleteThe ordering Avanair 200mg from Be Better Pharmacy was smooth, I’ve noticed significant improvements in my overall well-being. and I received my product in perfect condition, very quickly. Their customer service is excellent, always ready to assist if needed.
ReplyDeleteI’ve been using Cenforce 25 Mg. The ordering process was smooth and straightforward. Be Better Pharmacy website was user-friendly, and I appreciated how easy it was to navigate through their product listings. The product description was clear, and it gave me all the necessary information to make an informed decision.
ReplyDeleteMaxbull 100 Mg from BeBetter Pharmacy is by far the best supplement I’ve ever tried. It’s effective, and I’ve noticed improvements in my strength and stamina. Ordering was easy, and it arrived properly exactly as promised. I’m a loyal customer now. Thankyou BeBetter.
ReplyDeleteDigital Marketing Course in pitampura
ReplyDeleteDigital Marketing institute in pitampura